[Protocol Buffers] Import 其他 .proto
今天在 import google 提供的 proto 時候,在使用 protoc 編譯後,出現了下列的訊息。
因為這件事情,所以就花了一點時間搞懂 protoc 怎麼處理 import 這件事情。
IMPORT_PATH
這所有的一切的關鍵是在 IMPORT_PATH 這個參數上!!
IMPORT_PATHspecifies a directory in which to look for.protofiles when resolving import directives. If omitted, the current directory is used. Multiple import directories can be specified by passing the--proto_pathoption multiple times; they will be searched in order.-I=IMPORT_PATHcan be used as a short form of--proto_path.
上面的意思是說,如果沒有設定 --proto_path 這個參數,當下執行命令的路徑會當作尋找 import 檔案的根目錄,如果有設定的話,會以設定的路徑當作目錄開始找。 且此參數可以設定多次。
這是什麼意思呢? 讓我們跟著今天的範例,來了解 IMPORT_PATH 是怎麼運作的吧。
範例說明
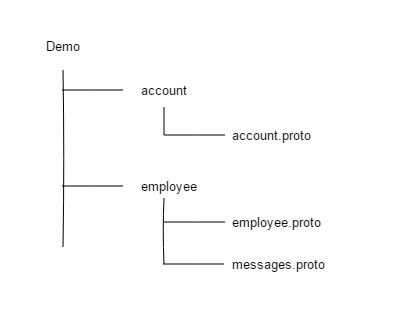
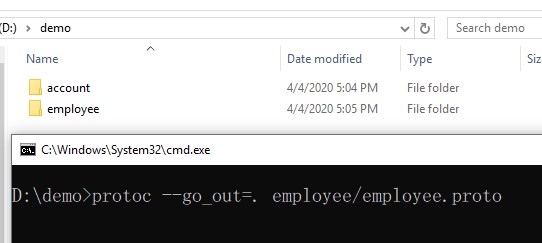
這是我今天要展示的目錄結構,首先我們可以看到最上層是 Demo 資料夾,這是我們的根目錄,也是命令提示字元會指向的路徑,接著下面會有兩個資料夾一個是 account 資料夾,裡面會有一個 account.proto,一個是 employee 資料夾,裡面會有 employee.proto, messages.proto。
 folder structure
所以根據上面的資料夾結構,如果我要編譯 employee.proto ,我就要輸入 $ protoc --go_out=. employee/employee.proto 來編譯。
 root path demo
為了方便展示,我每一個 proto 都是非常的簡單,都幾乎只有一個欄位,如下程式碼。1
2
3
4
5
6syntax = "proto3";
package employee;
message AddEmployee {
string employeeName = 1;
}
同一層資料夾的 import
這個範例呢,我們要在 AddEmployee 底下引用 messages.proto 的 HelloRequest。 根據我的直覺,想說在同一個資料夾,所以我 import 就這樣下 import "messages.proto";
- employee
1 | syntax = "proto3"; |
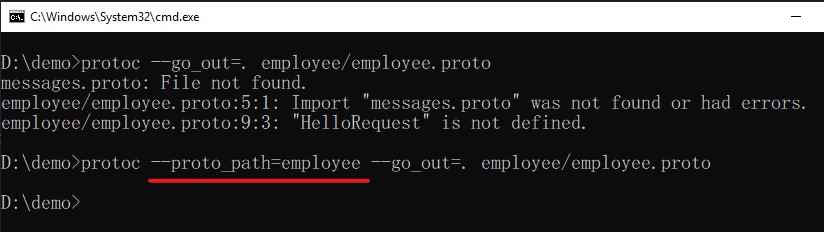
結果我執行編譯後,出現錯誤的訊息。
這是為什麼呢? 原因有兩個
- 因為我在
employee.proto是下import "messages.proto" - 而且我編譯的時候沒有下
--proto_path=employee的參數,所以他會在我下指令的那個路徑開始找messages.proto。 而他在 Demo 路徑底下當然找不到,因為檔案是在 employee/messages.proto。
為了解決這個問題,我們可以下 --proto_path=employee 告訴編譯器,請在 employee 資料夾底下找檔案。 所以當我指令改成這樣 $ protoc --proto_path=employee --go_out=. employee/employee.proto 他就會編譯成功了。
 success
但是,請注意這不是正確的做法,我只是要說明 --proto_path 的用法!!!
比較正確的做法是,每次 import 其他 proto 的時候都是以 IMPORT_PATH 根目錄 開始指定,所以我把 employee.proto 裡面的 import 改成 import "employee/messages.proto";。
- employee
1 | syntax = "proto3"; |
並且執行 $ protoc --proto_path=. --go_out=. employee/employee.proto。 這樣就會編譯成功了!!!
補充說明,這兩個指令是一樣的意思$ protoc --proto_path=. --go_out=. employee/employee.proto$ protoc --go_out=. employee/employee.proto
不同資料夾的 import
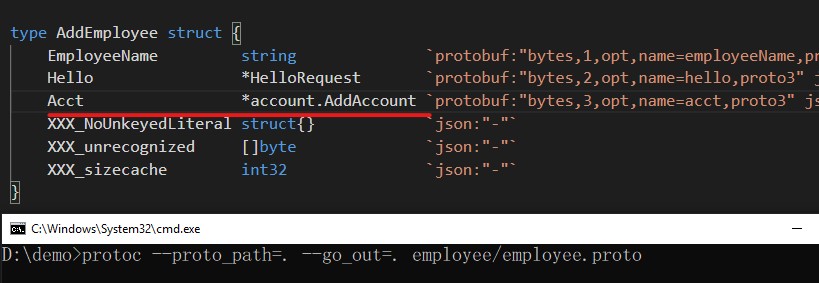
知道上面講的概念後,要 import account 的方式也很簡單,從我根目錄開始,account 的資料夾是在 account/account.proto,所以只要 import account/account.proto 就可以正確使用了。
這邊要注意,因為 account 在 account package 底下,所以在宣告型別的時候要加入 package 的前贅詞 account.AddAccount acct = 3 。
- employee
1 | syntax = "proto3"; |
調整完後,執行 $ protoc --proto_path=. --go_out=. employee/employee.proto,也會成功編譯。
Import google 提供的 proto
基本上我們也很常會用到 google 提供的一些型別,例如 protocol buffers 預設是沒有時間這個型別,所以我們這時候可以使用 google/protobuf/timestamp.proto 提供的 timestamp 的型別。1
2
3
4
5
6
7
8
9
10
11
12
13
14syntax = "proto3";
package employee;
import "employee/messages.proto";
import "account/account.proto";
import "google/protobuf/timestamp.proto";
message AddEmployee {
string employeeName = 1;
HelloRequest hello = 2;
account.AddAccount acct = 3;
google.protobuf.Timestamp Date = 4;
}
加入後,就會發現編譯又不會過了。

因為從 Demo 的根目錄開始,找不到 google/protobuf/timestamp.proto ,所以我們要先做的事情是下載這些 proto 檔案。
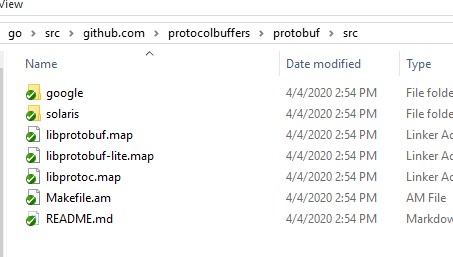
執行 go get github.com/protocolbuffers/protobuf 下載檔案,執行後你可以在 ${GOPATH}\src\github.com\protocolbuffers\protobuf\src 找到這些 proto 檔案,以我的例子是 C:\Users\Miles\go\src\github.com\protocolbuffers\protobuf\src。
 google-protobuf
知道 google 提供的 proto 路徑後,只要把路徑 --proto_path 設定好,就可以編譯成功了。
$ protoc --proto_path=C:\Users\Miles\go\src\github.com\protocolbuffers\protobuf\src --proto_path=. --go_out=. employee/employee.proto

如果是使用 git bash 或者是 linux 的 command prompt,可以把 GOPATH 當作變數設定,如: $ protoc --proto_path=$GOPATH/src/github.com/protocolbuffers/protobuf/src --proto_path=. --go_out=. employee/employee.proto
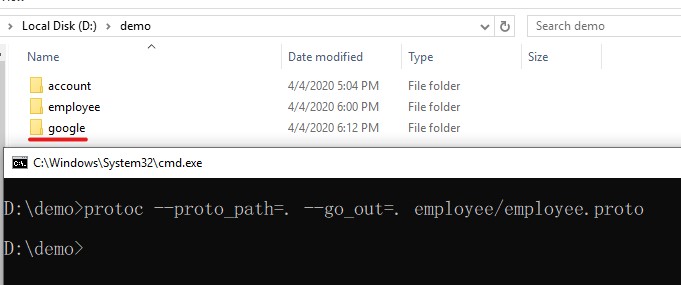
另外還有一種作法是,直接把 google proto 那個目錄整個複製過來。 這樣就不用額外指定 --proto_path 了
所以我就把 C:\Users\Miles\go\src\github.com\protocolbuffers\protobuf\src\google 這整個資料夾複製過來 Demo 資料夾底下,並使用 $ protoc --proto_path=. --go_out=. employee/employee.proto 指令編譯,這樣是沒問題的。
Import public
最後要說明一個 import public 的功能,這是用來整理 proto 檔案路徑的時候用的。
這邊舉個以下的例子,我想把 messages.proto 這個檔案改放到 newhello/newMessages.proto 底下,那我要怎麼使用 import public 這個功能呢?
 move proto
我們只要在 messages.proto 加入 import public "newhello/newMessages.proto" ,這是說,原本參考到 messages.proto ,將會導向新的 newMessages.proto。 只要使用這個方法,我其他地方的 proto 都不用調整,就可以輕鬆地整理 proto 的檔案位置了。 例如下面的例子,我的 employee.proto 是 import "employee/messages.proto" 可是實際上他會參考到 "newhello/newMessages.proto" 。
- messages
- newMessages
- employee
1 | syntax = "proto3"; |
其他補充說明
--proto_path 的別名: 相信在其他地方,你們也會看到這樣的指令 $ protoc -I=. --go_out=. employee/employee.proto,那個 -I 其實就是 --proto_path 的別名而已啦。
protoc 編譯的限制: 讀者可以發現,我在上敘的 proto 都沒有使用 service ,這是因為 protoc 只能編譯 message type,如果要編譯 service 的話,則一定要使用 plugins 才可以。 例如: $ protoc -I=. --go_out=plugins=grpc:. employee/employee.proto
延伸閱讀
[Go support for Protocol Buffers - Google's data interchange format]
[Using Other Message Types]